10 Beautiful DIY Hairstyles to Wear to a Wedding

Easy, elegant do-it-yourself looks that will last you through wedding season...and beyond.

Attending a wedding soon or have multiple special events lined up on the horizon? We reached out to Latest-Hairstyles.com, which features easy-to-follow hair tutorials, to learn how to create stunning 'dos that even newbies can master.

Show up tressed to impress with one of these 10 ideas for medium to long locks!

1. The Ultimate Waterfall Braid

This cascading effect is everywhere on Pinterest and it's easy to see why: it looks equally gorgeous on straight or curly locks. This braiding method requires a fair amount of practice, so you'll want to do a trial run in advance to get the motion down pat. 

diy wedding hair
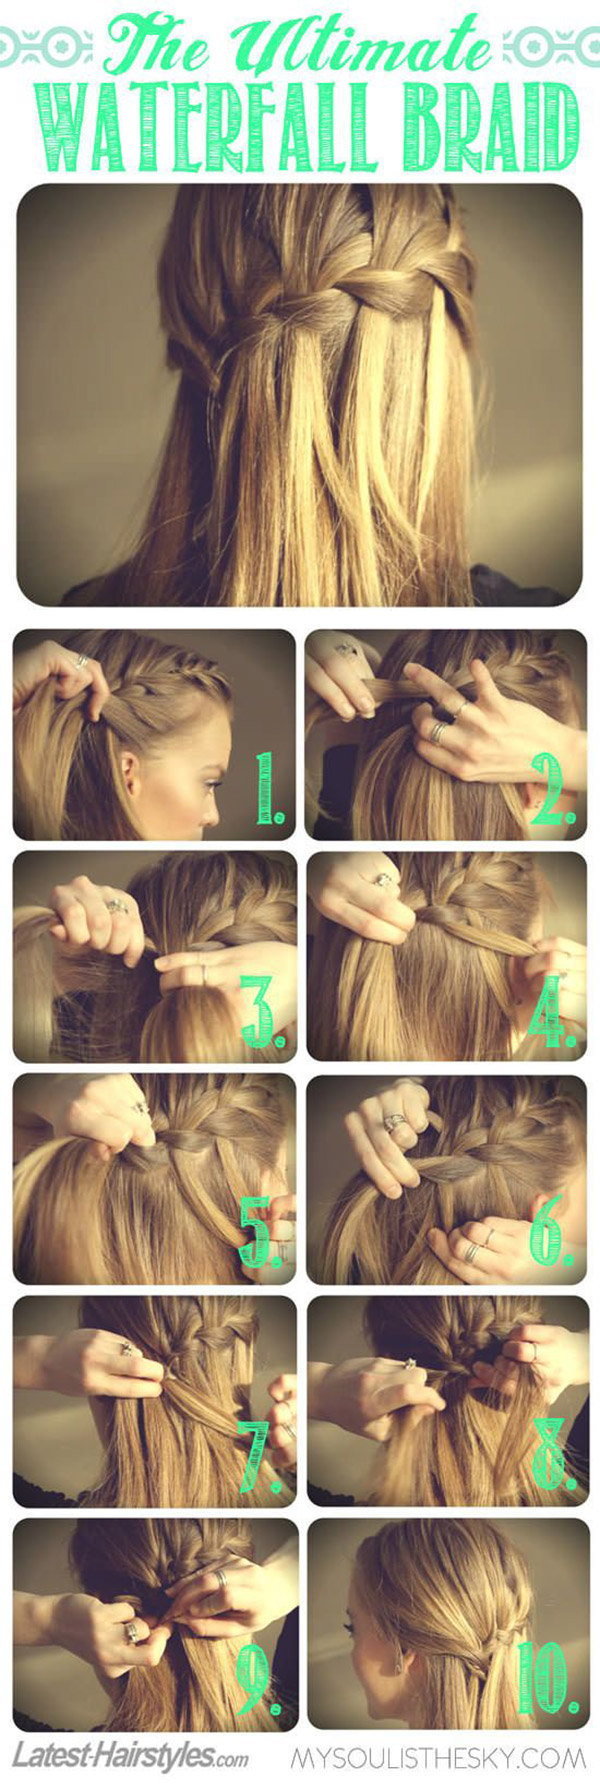
Created by My Soul Is The Sky on Latest-Hairstyles.com

Get the Look:

1. Begin with a French braid over your right ear.
2. Start the waterfall portion by pulling the left strand into the middle.
3. Then, take hair from the top and pull it into the middle as well.
4. Next, take the strand on the right and drop it down.
5. Pick up a section of hair that is directly behind the strand you dropped.
6. Place this section into the middle part of the braid and continuing this method, work towards the left side of the head.
7. Once you reach the left side, drop the strand of hair on the right as usual.
8. Then, wrap the left strand over the middle piece.
9. Place a bobby pin over the strand and secure it in place.
10. Use the other hair to hide the bobby pin.

Bonus: Watch the step-by-step video ►

Next: A pretty retro bouffant ►


2. Pretty Retro Bouffant

This loose, romantic updo is a cinch to create — simply roll, tease and twist!

diy wedding hair
Created by Hair and Makeup by Steph on Latest-Hairstyles.com

Get the Look: 

1. Begin by clipping the top half of your hair.
2. Once the top half is clipped up, put the bottom half in a low ponytail at the nape of your neck.
3. and 4. Create a small hole at the base of your ponytail and push the ponytail down through it, creating an inside-out ponytail.
5. Back-comb the ponytail.
6. Once the ponytail has been teased out, use your fingers to roll the ends of the hair upwards, creating a chignon.
7. Secure the chignon with bobby pins.
8. Let down the top half of your hair and create a deep side part.
9. Back-comb the top half of your hair for added volume.
10. Pull all of the hair from the top half loosely back and twist it one time, pushing it upwards and towards your scalp to create more volume. Secure it with bobby pins so it rests right on top of the chignon.
11. Continue to loosely twist the hair through to the ends, wrapping the ends around the side of the chignon and securing them with bobby pins underneath.
12. Gently loosen some small hairs around your face to soften the front.

Next: A low braided headband bun ►


3. Low Braided Headband Bun

We love this whimsical look for a beach or rustic setting since it keeps every strand in place, even during windy weather conditions. This particular tutorial uses a Dutch braid technique (also referred to as an upside-down French braid) but it can be easily modified to fit any braid style and it works best on second-day hair.

braided bun
Created by My Soul is the Sky on Latest-Hairstyles.com

Get the Look:

1. Separate a small section from the front of the hairline and then begin a small Dutch braid right behind it.
2. When the braid reaches the top of the ear, continue down in a regular braid and wrap a clear elastic band over the end.
3. Pull all the hair into a low ponytail at the nape of the neck.
4. Take small sections of the ponytail and wrap the pieces back into the band to create a chic bun.
5. Finish by tucking the front strands that were left out over the braid and pin them in place. Smooth down any flyaways with a light misting of hairspray. 

Bonus: Watch the step-by-step video ►

Next: A Kate Middleton-inspired half-up, half-down hairstyle ►


4. Kate Middleton-Inspired Half-Up, Half-Down Hairstyle

Every girl deserves to have princess hair for a day, even if they don't have a stylist available at their beck and call. Now thanks to this super simple tutorial, you can recreate the Duchess of Cambridge's signature look on your own in just 10 minutes flat!

diy wedding hairstyle
Created by Ma Nouvelle Mode on Latest-Hairstyles.com

Get the Look:

1. It’s best to start with mostly straight hair that has a little bit of curl at the bottom. This seems to be a favorite look of Kate’s.
2. Tease your hair at the crown and back a bit, but not all the way to the nape of the neck, just at the top. Create a mini bouffant at the crown of your head, leaving out the front. Secure with two bobby pins going straight across.
3. Start on one side — it doesn’t matter which — and take the front section of hair that you had left out. Pull it back and across, twisting at the end. Secure on the far side of the half-up section.
4. Repeat step 3 but with the remaining side securing on the opposite side as well.
5. Going back to the side you started with, take a section of hair from under the first section and pull over and across, lightly twisting as you go. Secure with a bobby pin on the far side, so the hair is brought all the way over.
6. Repeat step 5 with the other side.
7. Optional: Fluff the hair a little or add some hair pins to make sure there are no bald spots showing, but other than that, you’re done!

Next: An infinity braid updo ►


5. Infinity Braid Updo

Three-part braids come together to form a head-turning style that's stunning from every angle.

diy wedding hair
Created by How-To Hair Girl on Latest-Hairstyles.com

Get the Look:

1. For this gorgeous look, you will need to section the head into threes: two small side sections and one large section down the middle. French braid one of the side sections.
2. Do a regular three-strand braid on the remaining side section and larger middle section. Secure all braids with a small elastic.
3. Starting with your center braid, wrap it loosely into a bun.
4. Use bobby pins around the bun to secure it in place.
5. Take the French-braided section and wrap it under and around the middle bun. Pin into place.
6. Finally, take the remaining smaller side braid and wrap it over and around your middle bun. Pin that braid into place and spray the entire look with a hairspray of your choice.

Next: A twisted fishtail half-up, half-down hairstyle ►


6. Twisted Fishtail Half-Up, Half-Down Hairstyle

Add extra oomph to a curled hairstyle with this cool roped fishtail effect.

diy wedding hair
Created by Barefoot Blonde on Latest-Hairstyles.com

Get the Look:

1. Wash hair with TRESemmé Renewal Hair & Scalp Shampoo and condition with the Renewal Hair & Scalp Deep Conditioning Mask (leave it on for 5-10 minutes) and rinse with cool water. The formula is made with Tea Tree Extract and Sunflower Seed Oil to nourish the scalp and give you soft, manageable hair to create beautiful styles.
2. Spritz TRESemmé Renewal Hair & Scalp Leave In Conditioning Spray generously all over towel-dried hair, from roots to ends. Then blow dry and curl/wave hair.
3. Take two sections above each ear and twist them backward.
4. Secure the twisted sections with a clear elastic.
5. Make a fishtail braid with the ends of those sections.
6. Cut the elastic and voila!

Next: A woven low ponytail ►


7. Woven Low Ponytail

A classic ponytail will never go out of style but we're crushing on this fresh zig-zag style that screams black tie event.

diy wedding hair
Created by Missy Sue on Latest-Hairstyles.com

Get the Look:

1. Begin by taking a section of hair in a triangle shape from the right corner of the forehead and diagonally up from the left eyebrow.
2. Pull the hair to the back of the head and divide it into two halves.
3. Take the strand on the left and cross it over the top of the right.
4. Now pin down the section on the right side.
5. Take the hair next to the twisted section and lay it over the strands to hide the hair pin.
6. Next, take a section on the left side directly below the portion that was pinned.
7. Wrap it around the back of the head so it crosses over the first pinned section and slide a hair pin in to hold it in place.
8. Now, repeat steps 6 and 7 with a strand on the right side, crossing it over the previous section and pinning it in place.
9. Repeat these steps working all the way down the head until reaching the nape of the neck. You should end up with sections of hair crossing over the strand above it, creating a crisscross pattern.
10. Once you reach the nape of the neck, take a small section of hair from the right side and wrap it around the rest of the hair to create a low ponytail.
11. Wrap a clear elastic band around the entire ponytail.
12. Divide the pony into two sections and pull the strands in opposite directions so the elastic band slides up to the top.
13. Make sure the strand that was wrapped around the ponytail lays over the elastic band to hide it.
14. Finish by smoothing down any flyaways with hairspray.

Tip: Before crossing each strand over the back, spritz it with a hair wax and smooth it down with a comb to create a smooth look. Back-comb the top of the hair at the beginning to create a little volume at the top. Curl the ends of the hair with a curling iron to create a softer ponytail. Smooth a bit of dry Argan oil into the ends of the ponytail to hydrate rough ends.

Bonus: Watch the step-by-step video ►

Next: A twisted side ponytail ►


8. Twisted Side Ponytail

Show off a bedazzled or asymmetrical neckline with this sideswept style. A clear elastic band and a pretty hair clip keep the look polished.

diy wedding hair
Created by Missy Sue on Latest-Hairstyles.com

Get the Look: 

1. Starting with clean hair, part the hair on the right side then brush it all over the left shoulder.
2. Next, separate out a section of hair from the part down to the left ear and clip this aside to use later.
3. Take the hair on the right side and begin rolling the hair upwards towards the top of the head, creating a twist.
4. Continue rolling the hair upwards as you work your way across the back of the head towards the left side, adding in hair as you go.
5. Once all the hair is twisted and on the left side of the head, let down the section of hair pinned in step two. 
6. Take the loose section of hair and wrap it around the twisted portion creating a wrapped, side ponytail.
7. Grab a clear elastic band and wrap it over the entire ponytail to hold it all together. (Note: The hair wrapped around the ponytail will hide the elastic band and the band will hold it all in place.)
8. Next, fix any pieces in the front by pulling out your bangs or a few strands of hair near the ears.
9. Add in a pretty hair accessory if desired.
10. Finish with hairspray to keep everything in place.

Bonus: Watch the step-by-step video ►

Next: An embellished faux bob ►


9. Embellished Faux Bob

Craving a fun new change but you're not committed to a chop quite yet? Check out this adorable faux bob style — no scissors required.

diy wedding hair
Created by Missy Sue on Latest-Hairstyles.com

Get the Look:

1. Start by dividing the hair at the ears into two sections: top and bottom. Clip the top portion out of the way and leave the bottom half down.
2. Grab your favorite curling wand or iron and carefully curl 1-inch sections away from the face.
3. Let the top portion down and divide that section into two halves; securing the top with the clip again. Repeat step two, curling the hair away from the face.
4. Let down the top portion and repeat step 2 once more.
5. When all your hair is nicely curled, separate the hair again into two sections, top and bottom, clipping the top portion out of the way.
6. Gently twist the bottom hair that was left out into a small bun at the nape of the neck. Secure the bun with pins. This will be used to secure the top portion of the hair into the bob.
7. Now remove the clip from the top half and separate it into two halves, left and right.
8. Beginning on the right side, slowly twist the hair towards the back of the head and wrap it over the top and back around the bun in the back, then pin it into place.
9. Now, repeat step 8 with the left side.
10. The hair should feel pretty snug, so gently loosen it by pulling the hair at the top of the head. Be careful not to pull too much so it doesn’t come loose from the pins.
11. If any pieces do become too loose, simply twist them back under again and pin them at the nape of the neck. (The front pieces are usually the shortest, so leave a few of those out for a more casual look.)
12. Slide an embellished clip into the heavy side of the part.
13. Finish with a few spritzes of hairspray, and you are ready to go!

Bonus: Watch the step-by-step video ►

Next: A double twisted bun ►


10. Double Twisted Bun

For a timeless look that suits any season or wedding style, opt for the double twisted bun. It looks great on center or side-parted hair and is ridiculously simple to pull off.


Created by Wendy Rose Gould on Latest-Hairstyles.com

Get the Look:

1. Comb out your hair and apply a smoothing serum. Then create a side part using a rattail comb.
2. Divide your hair into three sections. The two sections on the side should be the same while the middle section is slightly bigger. You can use your fingers or a rattail comb to divide the sections, but we find that using your fingers is easier and just as effective.
3. Secure your middle section into a low ponytail with a clear elastic, then wrap it into a regular bun.
4. Divide the right section of hair into two even sections. Tightly twist the first section back toward your bun and then wrap it under and around before securing. Repeat with the second section of hair on your right side.
5. Repeat this same process on the left side, except instead of wrapping the twisted sections under and around, wrap it over the bun and then secure.

Bonus: Watch the step-by-step video ►


Comments