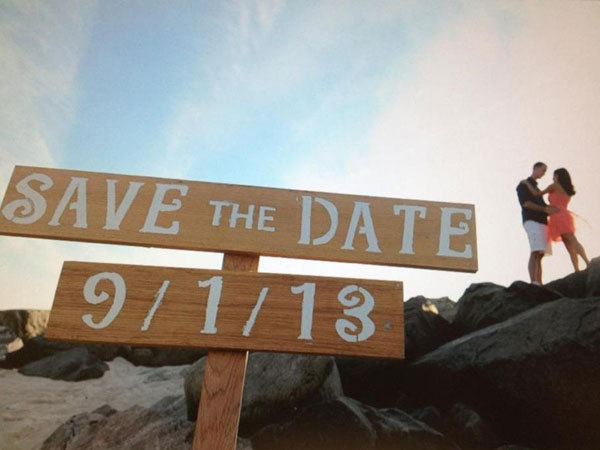
Photo Credit: Josh Lynn Photography
By now you may have noticed that we have a penchant for creative photo ideas around these parts, so for my personal engagement photos, the pressure was definitely on. After researching these amazing save-the-dates, I knew I wanted to find a way to incorporate my wedding date into the photo itself, rather than just slapping on some text. BG brides, meet my first DIY project.
Unlike a handheld sign, this stand-alone bad boy can be placed anywhere. It will only set you back around $15-$20 depending on the materials you use, compared to $100+ if you buy it premade on Etsy. Best of all, it's versatile and can easily be customized for bridal showers and weddings, too.
I couldn't have done it without the help of my dad, a contractor, and my photographer Josh, who was sweet enough to lug it around at the beach and set up the most incredible shot. My fiancé Jason and I got some ribbing from family, friends, and even strangers about it (one guy at the beach screamed, "I'll be there!" when he saw it), but I think the end result speaks for itself.
Materials:
- Three pieces of one-inch thick oak wood to form the sign (cut to the following dimensions below)
- Electric or hand saw
- Cordless drill
- Ten 1 ¼-inch screws
- Stencil brushes (I don't recommend using regular brushes for this project)
- Weather-resistant, gloss acrylic paint
- 4-inch alphabet and number stencils
Step 1: Cut Your Wood
The oak wood needs to be cut as follows:
- Bigger top piece: 36 inches long by 6 inches high
- Smaller bottom piece: 30 inches long by 6 inches high
- Stake piece: Four feet high
If you don't feel comfortable cutting it youself, you can go to a local lumber supply house like Home Depot and ask them to cut the wood to these specified dimensions. The third piece needs to be cut on an angle so that you can stick it into the ground for hold.
Important: These measurements were derived from using 4-inch stencils and a 17-character message. Adjust the wood accordingly based on how long or short you want your message to be.
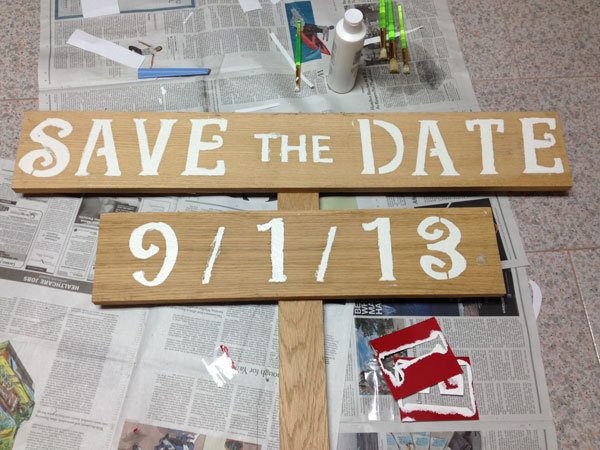
Step 2: Form the Sign
Drill five of the screws into the back of the bigger top piece and another five into the back of the smaller bottom piece to connect them to the stake portion.
Step 3: Space Out Your Message
If you want your sign to look more polished, I'd recommend using plastic stencils instead of paper. I used the latter and it bled through the wood, which led to a more rustic look.
Lay out the stencils in your desired message to make sure there's enough room for it on the sign. We had to squeeze in the word "the" using handmade stencils that were a little bit smaller, around 3 inches. Use your best judgment as far as size.
Measure from the top to the bottom and side to side to make sure that the letters are evenly spaced and center-aligned. Once everything looks perfect, tape the stencils so they don't move around during the painting process.
Step 4: Paint and Repeat
Paint two coats, wait and let dry an hour in between each. I used white "#20408" from Apple Barrow by Plaid, but you can use any color you'd like.
— Stefania Sainato
- ssainato's blog
- Log in or register to post comments


