How to Reuse Wedding Items as Holiday Décor
Before you toss out all of your wine bottles, corks, and mason jars, try these quick tricks that can turn those items (and more!) into festive holiday decorations.
By: Kristen Klein
-
Snow-Covered Wine Bottles -136781
This beautiful wintry centerpiece is a cinch to create.
Supplies:
Krylon white flat spray paint
Elmer's Glue-All
Water
Foam brush
Epsom salt
Clear sealer spray (I used Krylon Glitter Blast Clear Sealer)
Silver and white branches from Michaels
Silver tray or charger (you can find inexpensive ones at Michaels or a dollar store)Directions:
1. Remove the labels and foil from your bottles.
2. Spray each with Krylon flat white spray paint (if using dark bottles, you may need to apply 2-3 coats). Let dry for 24 hours.
3. In a small bowl, mix together a solution of equal parts Elmer's Glue-All and water.
4. Using a foam brush, coat a bottle with the glue solution.
5. Roll in Epsom salt.
6. Once dry, seal with a clear sealer spray. This will help prevent flaking.
7. Add some silver and white branches, and arrange on a silver platter. Decorate with silver ornaments, if desired. Glitter Wine Bottles
Craft a beautiful display for your mantle or entry-table from used wine bottles.
Supplies:
3 wine bottles (any shape or size)
Sandpaper
Krylon Glitter Blast spray in various colors
Alphabetical letters from MichaelsDirections:
1. Remove the labels and foil from your wine bottles.
2. To help the glitter spray adhere to the glass, lightly go over the surface with fine-grit sandpaper.
3. Spray the glitter onto the bottles.
4. Let dry for at least 20 minutes; apply a second coat. Then let dry for 24 hours.
5. Apply the letter stickers to spell out words/phrases of your choosing.Photo: User-submitted via Pinterest
Wine Cork Wreath
Use your corks to create a mini wreath that’s perfect for hanging from your front doorknob.
Supplies:
14 corks
14 small bells
Floral wire
Drill
Ribbon
Hot glue gun (optional)Directions:
1. Drill small holes (just big enough to fit your floral wire) about ¼ of an inch from the top and the bottom of each cork.
2. Thread a long piece of floral wire through the top hole of each cork, adding a bell between each.
3. Then, thread a separate piece of wire through the bottom hole of each cork.
4. Pull the wires together to create a wreath shape, and twist the wires to close, hiding them in the back. Tip: If your bells aren’t hanging the way you’d like, flip the wreath over, arrange the bells as desired, and apply an small dot of hot glue to connect the edge of each bell to the cork.
5. Thread a ribbon through the top of the wreath, tie a bow, and knot the other end.Wine Cork Tree
Another fun way to use corks is to create mini trees.
Supplies:
7 corks, stained red
7 unstained corks
Hot glue gun
Razor bladeDirections:
1. Glue together each row of corks.
2. Stack on top of each other and attach with glue.
3. For the base, cut one cork into two even halves using a razor blade. Glue the halves together with one in front of the other to create a sturdy base.Wine Cork Ornament
Before your wedding, ask your venue to set aside all of the corks used that evening.
Supplies:
3 corks, stained red
6 unstained corks
Elmer's Glue-All
Green food coloring
Water
Small bowl
Foam brush
Hot glue gun
Ribbon
Ornament hookDirections:
1. Take 3 of the unstained corks and dye the tips green; I used a solution of Elmer’s Glue-All, water, and food coloring, applied with a foam brush. Wipe off any excess and let dry. Add a second coat if desired.
2. Tie a ribbon around the cork you’ll want at the top of your mini-wreath, and arrange the others in a circular pattern around it.
3. Holding the corks steady, apply a thin strip of hot glue between each cork.
4. Once dry, thread an ornament hook through the ribbon.Tip: If you want to try this but don’t have any wine corks, contact a local vineyard and see if they can set aside some corks for you (thanks, Hopewell Valley Vineyards!).
Wedding Invitation Ornament
Have a stack of extra wedding invitations sitting around? Turn one into this adorable keepsake ornament! Get the tutorial here.
Wedding Bouquet Ornament
We’re obsessed with this incredibly creative way to preserve your bouquet. After you’ve dried your bouquet, cut it up and put the flower pieces in a clear glass ornament! Get the full tutorial here.
Photo Credit: Photography by Susie
Snowman Tea Lights
Turn your battery-operated tea lights into these adorable little snowmen with a few steps from Inking Idaho.
Snowy Mason Jar Candles
You can also turn your mason jars into pretty candleholders.
Supplies:
Mason jars
Red ribbon
Green cord
Red and green bells
Floral wire
Hot glue gun
Epsom salt
Battery-operated tea light candlesDirections:
1. Wrap the green cord around the rim of one jar; add two red bells before tying a bow.
2. On the second jar, attach two green bells to the rim of the jar using floral wire.
3. Wrap a piece of red ribbon around the rim, hiding the floral wire. Hot glue end ends of the ribbon to the jar.
4. Fill the base of the jar with Epsom salt.
5. Add a tea light candle to each, and you’re done!Mason Jar Snow Globe
Mason jars are so prevalent in weddings now; but what do you do with all of those jars once the wedding is over? We love this idea from The Sweetest Occasion: turn your jars into adorable snow globes! Get the tutorial here.
Design and styling by Cyd Converse for The Sweetest Occasion/Photo by Alice G. Patterson
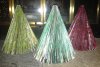
Glitter Magazine Trees
If you’re like most brides, then you probably amassed a huge collection of Bridal Guide magazines during your planning process. Turn those magazines into festive trees with a few easy steps! Though simple, this project is a little time-consuming, so throw on your favorite Christmas movie while you’re crafting.
Supplies:
2-3 magazines (to save time, you can cut one magazine in half using a razor blade to get two trees from one issue).
Elmer's Glue-All
Water
Foam brush
Small bowl
GlitterDirections:
1. Fold each page diagonally from the upper-right corner to the magazine’s left seam, making a triangle. (Need a visual? Go here.)
2. Then, fold that same page over again in the same direction to the seam.
3. Part of the page will now hang below the magazine; fold the overhanging part up so that it’s even with the bottom of the page.
4. Once you’ve folded every page, spread the pages to create a tree shape.To add glitter:
1. Mix together a solution of equal parts Elmer’s Glue-All and water.
2. Push all of the pages back together (so that it’s like you’re holding the magazine, only folded).
3. Apply your glue solution on edges of the pages with a foam brush.
4. Sprinkle glitter on top.
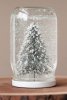
5. Carefully spread the magazine pages back out and let dry.Apothecary Christmas Village
If you had a candy buffet at your wedding, then you probably have a bunch of apothecary jars collecting dust in your closet right now. We love the idea of using them to create a mini Christmas village!
Supplies:
Apothecary jars
Epsom salt (found in a drugstore or grocery store near the sports medicine)
Faux snow-covered trees from Michaels
Houses and figurines from a dollar storeDirections:
1. Fill the bottom of the jar with Epsom salt, which gives a snowy effect.
2. Arrange your trees, houses, and figurines to your liking inside of the jar.Bonus: In the summer, you can use those same apothecary jars to create a beach scene, using sand, shells, and little umbrellas and chairs!